Wednesday, December 16, 2015

The Science Behind... scoring your dough and not being afraid


As we make our way through the "life cycle" of your bread dough, I thought I would take some time to explain one of the scariest steps to bread newbies- scoring your loaf!

Scoring is pretty important, and not just because it makes your finished loaf look pretty. 

Also, it's really not that scary - I promise!


For this tutorial, we'll go over:

1. What does scoring do?
2. Does all bread need to be scored?
3. How do I do it?
4. My bread collapsed when I scored it!  What did I do wrong?


1. What does scoring do?

Besides making your finished loaf pretty, as I stated above, scoring allows the loaf to have a controlled rise while baking.

Ok, let me back up.

In a bread dough, you have yeast releasing carbon dioxide, and this carbon dioxide gas is trapped by a net made of long gluten strands.  When the gluten net traps the carbon dioxide, the dough rises.  If you put the dough in a warm place to rise, it will rise more quickly.

That is essentially what you are doing when you bake your loaf of bread - you are heating the dough and causing the yeast to release carbon dioxide in a frenzied state.  The dough basically explodes with the huge amount of carbon dioxide released all at once.  How much the dough rises during the baking stage is determined by the strength of the gluten net, how quickly the crust of your dough forms, and the temperature of your oven.

By scoring your loaf in a pattern, you cut through some of the gluten net, and provide weak points for the dough to expand.  Because the dough doesn't need to push through a thick gluten net, it will expand more quickly and thus result in a larger finished loaf with bigger holes.
Let me say that again:

You want your bread to expand as much as it possibly can in the oven.  If your gluten strands are formed properly, they will create a thick net, preventing your bread from expanding to its full potential.  By scoring your loaf, you create weak points that allow your bread to expand more easily.

If you don't score your loaf, it will still expand, but in a jagged pattern.


Or it will find a less desirable weak point:

This crack along the side of my loaf is common in breads baked in a bread pan BECAUSE the dough exploits a weak point along the side created by the shaping process.  Sometimes you can use this to your advantage, such as in shaped loaves like braided challah:

You can see how the dough expanded at the weak points created between the braid strands.  Cool, huh?  You can see it here in these croissants too:


2. Does all bread need to be scored?

Short answer - No.  If you don't want to, you really don't have to.  But if you care to make uniform loaves that expand to their maximum size, you should try it.

Whether or not you should score your loaf is determined by the hydration of your dough and the temperature of your oven.

  • Hydration: If your dough is too wet, from 85% hydration to 100% hydration (or beyond!), scoring your loaf will do nothing.  It's basically going to expand all over.  Not to mention, a wet dough is impossible to score with a knife because you don't encounter any resistance.  
  • Oven temperature: if you are baking bread at a low temperature (375 degrees F or below), you don't really need to score your loaf if you don't want to.  
In summary: breads that are of average hydration (66% to 85% hydration, or your typical sandwich breads, buns, rolls, boules, and baguettes) and baked at high heat should be scored.

Breads that are high hydration or baked at a low temperature do not need to be scored.

Again, bread doesn't NEED to be scored.  As your bread expands, it will find weak points on its own to exploit.  But scoring does provide a controlled area for your bread to expand during baking.

Also, don't discount the superficial "pretty" factor!  I score my loaves differently based on who is receiving them.  Or, you can create a scoring pattern that is "yours."  This is my usual scoring pattern for communion loaves:

This is a typical scoring pattern for Irish soda bread:

My buns are scored with kitchen shears!

Loaves baked in bread pans get a single line across the top:

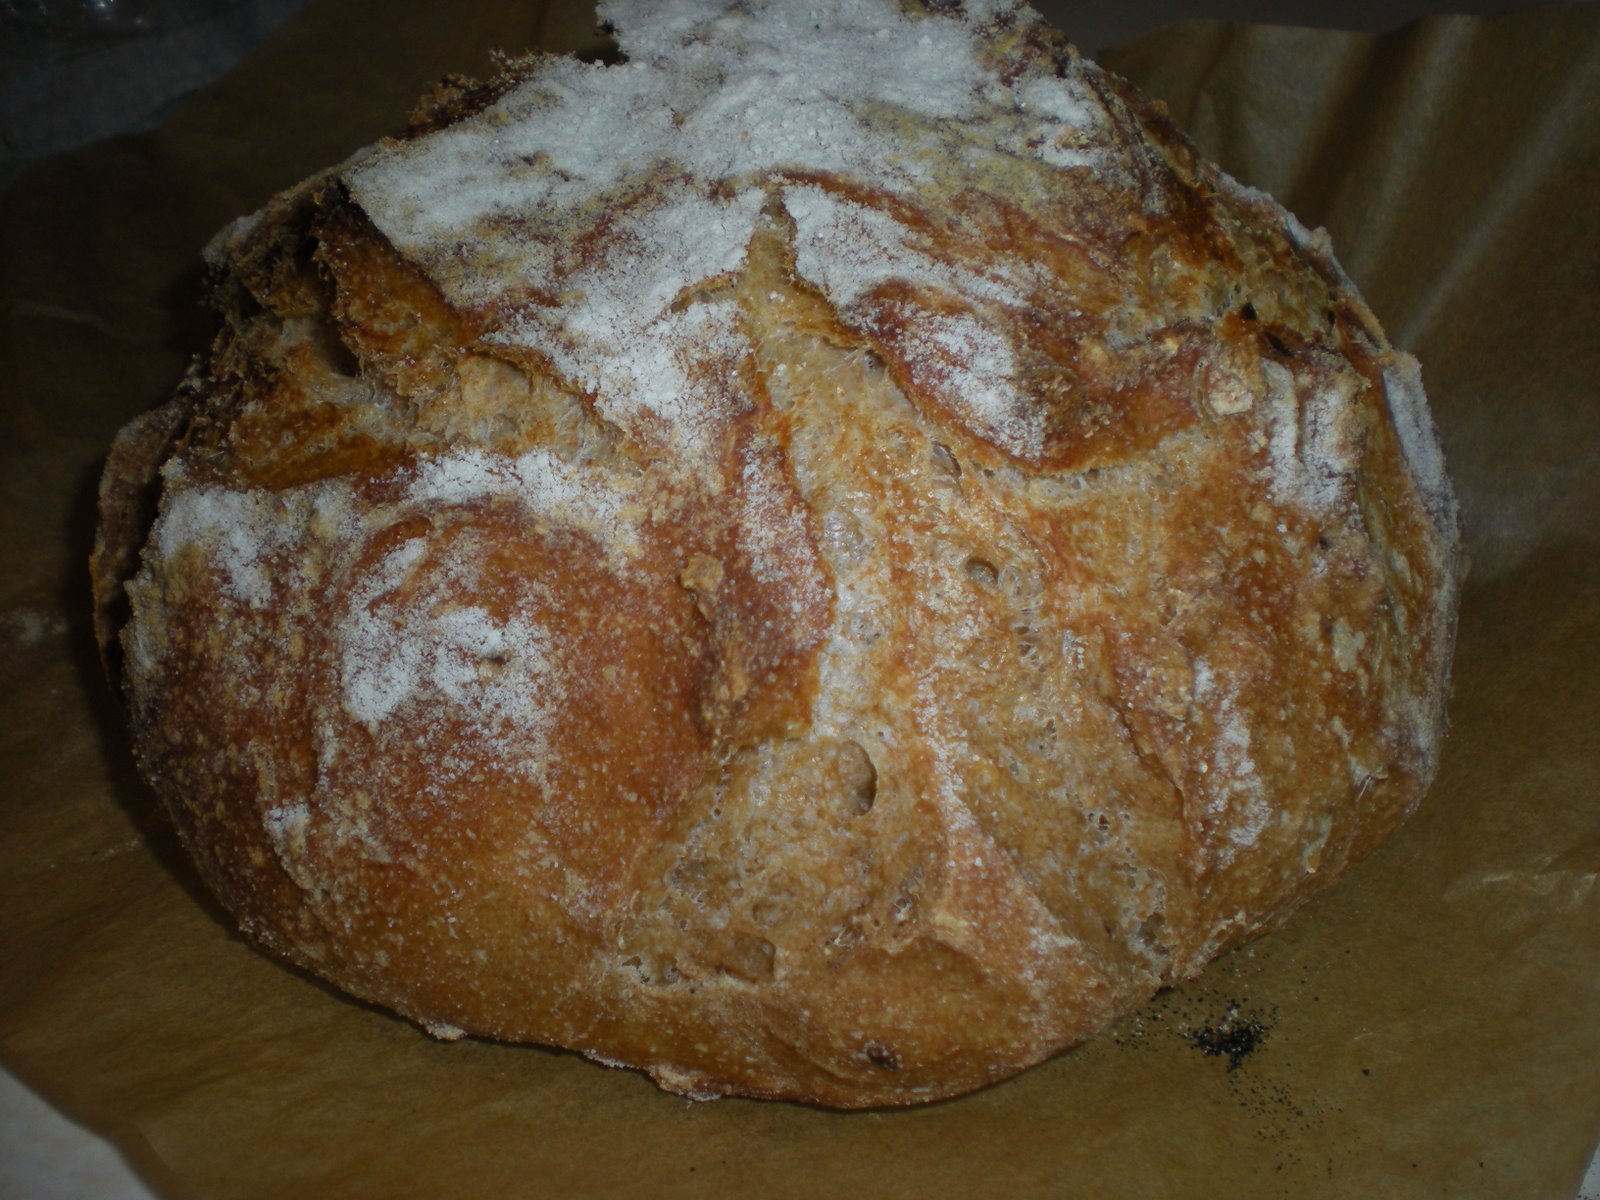
My non-communion everyday scoring pattern:


3. Ok, I'm totally on the scoring train!  How do I do it?

There are lots of ways to score your dough, as you can see above!  But how, exactly, do you do it?

First, let's consider our tools.  A razor blade makes very good, exact cuts.  This is what I used to use.

With kids in the house who can get into things, I switched to a serrated knife.

There are also special tools you can buy for scoring, called lames.
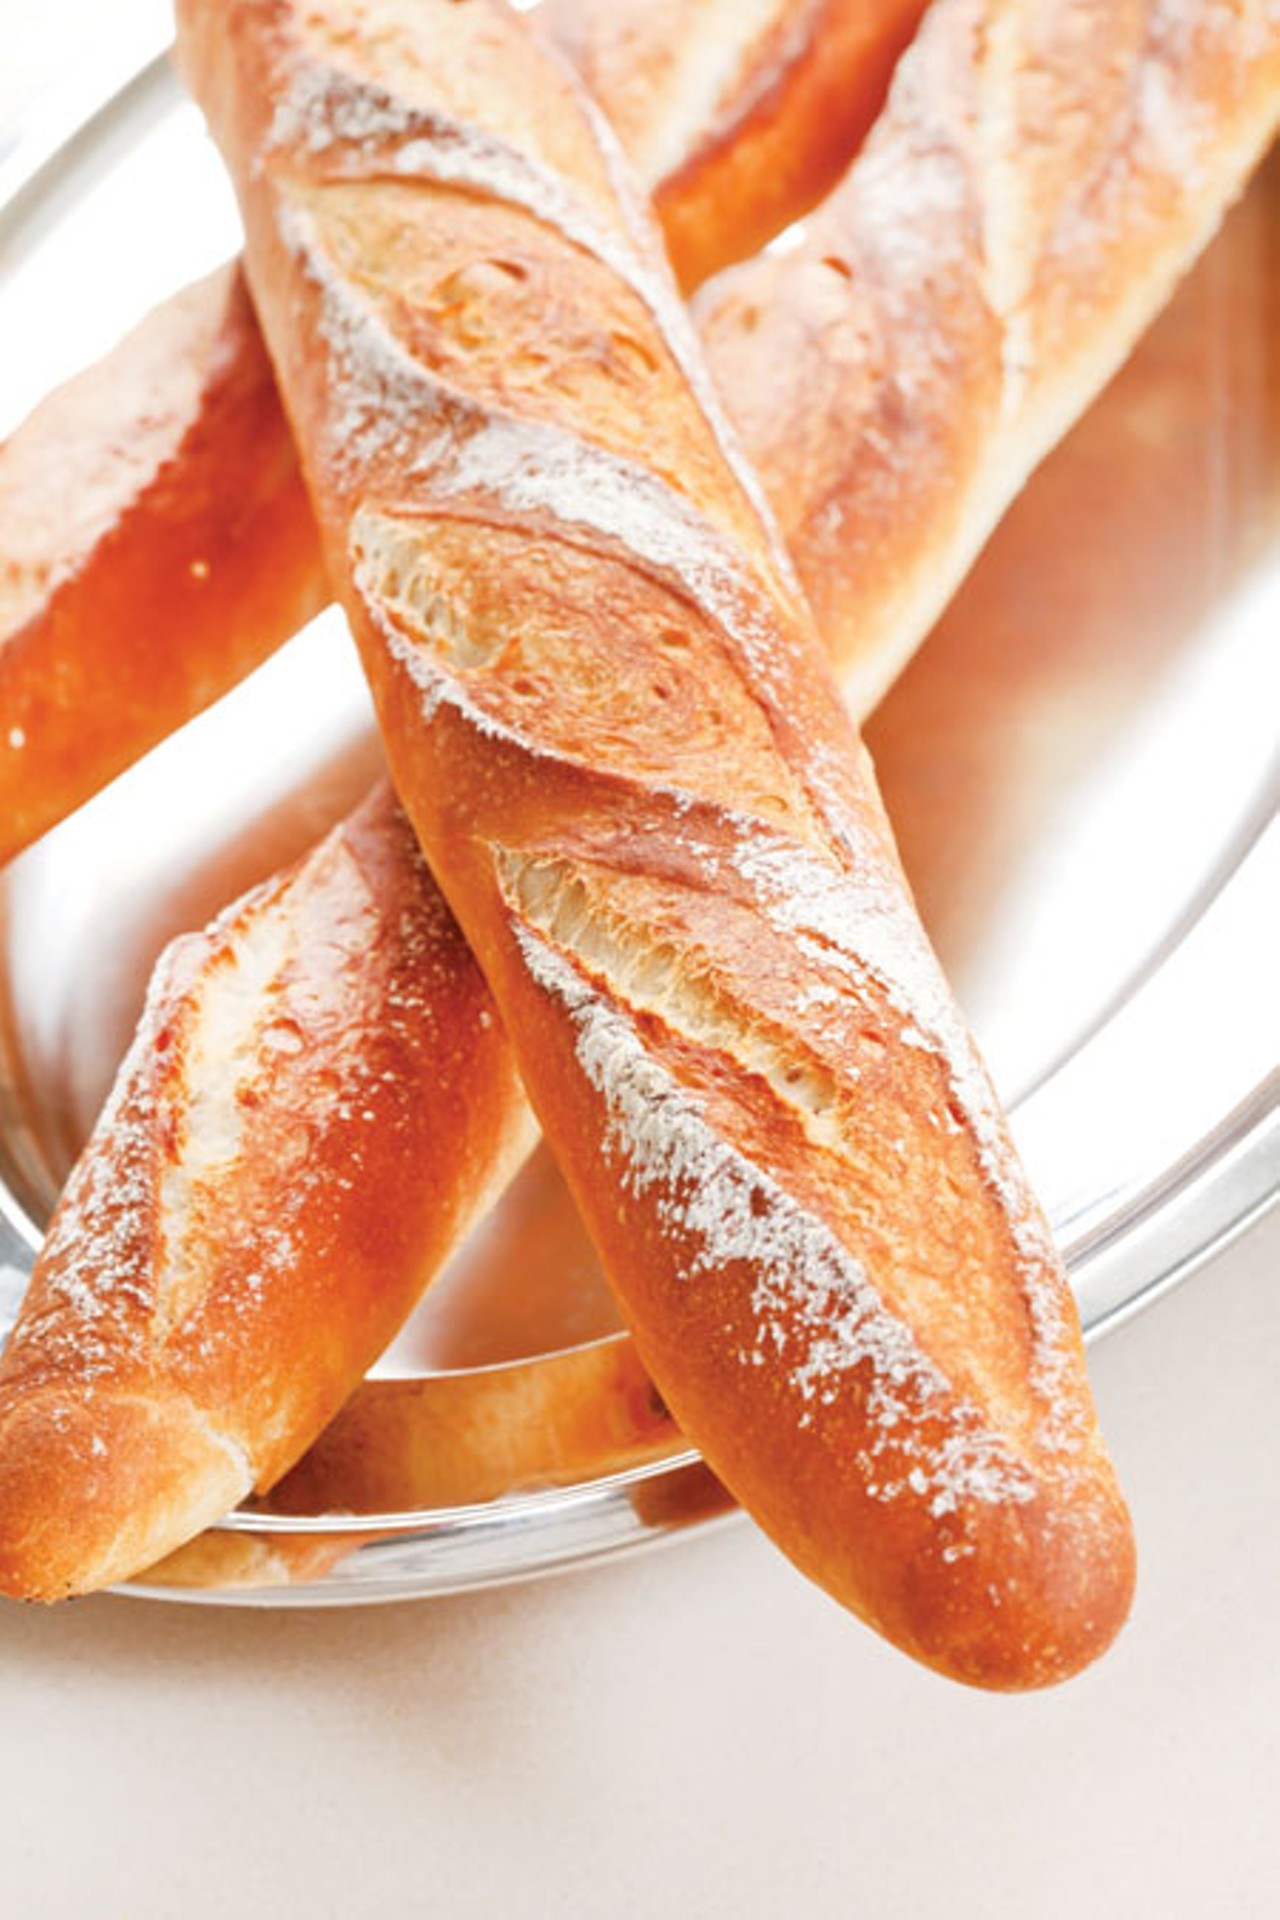
This video shows someone using a lame to score a baguette to make the typical "ear" pattern.

Yes, this pattern is called an ear!

 http://media2.fdncms.com/charlotte/imager/where-to-find-it-a-baguette-franandccedilaise/u/zoom/3101326/food_connecting1-1_14.jpg

Ok, now to score your loaf.
Let's assume you have let your bread rise once, you've shaped your loaf into the desired shape (either boule or in a bread pan), and let it rise for the recommended time.  Your oven is hot and ready.

Pick up your chosen implement, either razor blade, knife, or lame.

Take a deep breath.

Now, using a CONFIDENT and quick motion, make a cut about 1/2 to 1 inch deep into the top of your dough.  Once you decide to make your cut, COMMIT to it.  It needs to be deep, and you need a smooth cut that is about the same depth throughout.  If you hesitate, the dough will stick to the knife and your lines will be sloppy.  Once you make the initial large cut, you can go through again with smaller cuts to make it deeper.

 A simple cross pattern is a great place to start.

A neat and easy way to score buns or rolls is to use kitchen shears!  Facing the point of the blade directly down towards the top of the bun, make two snips into the top.  That's all you need to get that cross pattern!  So easy!
If that description was confusing, here's a picture..


Once your loaf is scored, don't hesitate.  It's ready to bake!  Throw that baby in the oven and get ready for some seriously sweet oven spring (because that's what it's called, when the bread expands in the oven).

4. Troubleshooting
  •  I scored my loaf and the dough just deflated!
    • Some deflating is natural as gas is released from the cut edges. But if it falls flat, that means you overproofed the loaf (let it rise too long).  I would roll the dough back up into a ball, reshape it, and try for that second rise again, rather than trying to bake a deflated loaf.
    • Another option, if your dough is really, really overproofed (imagine you forgot about it and came back two hours later) is you can bake it without scoring.  This is good for high hydration doughs too, that really rely on that gluten structure to hold in all the water.
  • I scored my loaf and it didn't expand in the oven!
    • Again, this is a symptom of overproofing.  An overproofed loaf will spread at the scored edges, rather than springing or popping open as it expands.
  •  I scored my loaf but it created a jagged pattern anyway!
    • Unlike the first two, this could be a sign of two different problems - either underproofing or not scoring your loaf deep enough.
    • Underproofing means you didn't give the dough enough time to rise during the second rise.  
    • If you didn't score your loaf deep enough, the dough won't expand exclusively into the  weak points your scoring was supposed to create.  
I hope you learned a lot from this edition of The Science Behind!  Don't be scared to score your loaf- it makes a big difference.


Friday, December 11, 2015

The Science Behind... shaping your dough


Hey everyone!

I hope you have enjoyed reading these posts as much as I have enjoyed writing and sharing them with you!  My favorite part of baking has been sharing my knowledge with others and passing it along.

After you have let your bread rise and ferment, you will want to shape it and give it one more short rise period before baking.  During this time, you can shape your dough into a simple round shape or something more complex.

In this post, I will touch on the following topics:

1. Why do you need to shape your bread?
2. When is it better NOT to shape your bread?
3. How/when do I do it?
4. What shapes can I do?
5. What are some tips for successfully shaping a boule/using loaf pans?
6. My dough is shaped, now what?

 Ready?  Let's dive right in!

1. Why do you need to shape your bread?  Shaping your dough does a few things.  First, shaping your dough after the rise and ferment will make sure the gluten formation is uniform and strong across the loaf.  Gluten formation is key for baking bread because, as I've tried to emphasize throughout this series, successful bread is all about creating the correct relationships between the yeast, which exudes carbon dioxide bubbles, and the flour and water, which create a net of gluten to trap the bubbles.   When gluten proteins initially form, they are all squiggly.  By shaping your dough, you stretch them out to create a better net.
 
You can kinda see the gluten strands running criss-cross over the top of this loaf.
Second, by shaping your dough you create small, uniform holes throughout your dough.  This is good particularly for breads like sandwich breads. 


Another reason to shape your bread is that it provides weak points for your bread to spread during baking.   By controlling where and how the bread spreads, you can make it look pretty.  For example, look at a few breads I've done in the past:


The sky is really the limit!
 
If you don't shape your loaf, it will still rise when you bake it.  But it will have a more irregular shape.  For things like ciabattas, that is fine.  But even ciabattas benefit from some light shaping before they go in the oven, as you can see Peter Reinhart demonstrating here.

2. When is it better NOT to shape your bread before you bake it?  There are two reasons not to shape your bread: 1) you want REALLY big holes, irregularity be damned, and 2) if the dough is very high hydration, you won't really be able to shape it beyond some basic stretch and folds.
In this video, Jim Lahey barely shapes his dough before tossing it in the oven (at about 2:17).


3. How /when do I do it?
This video (sorry for all the videos, but this is a step that really benefits from showing rather than telling!) shows how to shape a dough for a sandwich loaf.


As you can see, you want to shape your dough after it has gone through the first long rise (leavening/fermentation).  The baker gently deflates the big bubbles, rather than punching it down the way most cookbooks used to advise (I still sometimes punch the dough down if I'm feeling...punchy that day ;)  The key for shaping a sandwich loaf is making sure to really pinch together the seam so it isn't a weak point and blow out during baking, like this:
After you gently deflate your dough, you will want to divide it into the size dough you need (if your dough is the exact size you need, skip this step).  If you are making rolls or pretzels, you need to figure out how many pieces you need.  Or if you are making a four- or three-stranded challah, divide the dough into the right number of strands.  A kitchen scale and calculator can help you get pieces of uniform size.
a bench scraper makes this process easier

After you divide the pieces, cover the dough with a towel or plastic wrap and let it rest for about 10 minutes.  This will give the gluten a chance to regroup and relax after the dough has been divided.

Once you have let the dough rest, you are ready to shape.  Make sure your hands are clean and dry, and sprinkle some flour on a clean flat surface like your countertop.

An easy shape to do is a boule (round ball).  After the rest on the counter (sometimes called a bench rest), do a few stretch and folds.  Then pick your dough up in your hands with your thumbs on top of the dough and your other fingers under the dough.  Gently bring the edges of the dough underneath until the top of the dough is smooth and taut.
Transfer the dough to a piece of parchment and let the dough rest one more time for about an hour. 

4. What shapes can I do?  The answer to this question is obviously what shapes can't you do.  Moving on.

Just kidding!  The internet has tons of tutorials on different shapes.  There are also traditional shapes for different breads, such as baguettes for french breads, brioche a tete, challah breads, folded-over stollen, etc. etc.  That is a good place to start, since some breads are a particular shape for a reason, which I talk more about below. 


5. what are some tips for successfully shaping the boule/using loaf pans?
  • My #1 tip for  shaping your dough is this: making sure your dough is the correct hydration for the shape you want.  You will not get a complicated challah braid from 100% hydration dough, no matter how many stretch and folds you do.  The sweet spot is about 66-70% hydration for most shapes.  Boules can withstand higher hydration.
  • Think about what you want the bread for.  Some shapes are utilitarian, while others are more fanciful and festive.  Sandwich bread is baked in a loaf shape for a reason.  As you might know, I bake bread for communion for my church.  I realized that the easiest shape to cut small cubes from was not a boule, but a loaf pan shape.  But I knew a loaf of sandwich bread would look silly at the front of the sanctuary.  Now I bake one boule with a fancy scoring pattern for the "look pretty" bread, and one sandwich loaf for the little communion pieces that are passed around and eaten by the congregation.
  • Use the right ingredients.  If your dough is full of dried fruit, it might be hard to shape into a delicate pattern.  Whole wheat flour might also be difficult to shape (though not impossible) because of its lower protein content.
  • Make sure to get enough gluten formation before you shape.  The typical shape of Irish Soda Bread looks like this:
Why?  Because it is leavened with baking powder and baking soda.  These chemicals are activated immediately, so there is almost no time for gluten formation.  You have to slap that dough into a round shape, score it and bake it.  A dough with very little gluten formation will not hold a shape well.  For tips on kneading and gluten formation, check out this post.
  • Use the right baking temperature. When dough is baked at high temperature, the yeast goes nuts and produces a ton of carbon dioxide, basically blasting open your dough at any weak points.  For a boule, this is encouraged.  For a shape like challah, you want to prevent this from happening.  So you need to bake most shapes slowly to preserve the smooth crust.
  • Use an egg or milk wash before baking to prevent your dough from cracking. A dry crust will split and not look as nice.  An egg or milk wash will provide a little moisture so the dough can expand in the oven without cracking.  I'm partial to an egg wash since it leaves that nice sheen!
 

 6. My dough is shaped!  Now what do I do? At this point, your bread is almost ready. You will want to make sure your dough doesn't dry out during this period, so you can either 1) invert the bowl you used to leaven the dough on top of your shaped dough thusly:

Or, you can cover your dough with a piece of plastic wrap.  If you are worried about the plastic wrap sticking to the dough, you can cover the dough with flour, semolina or rice flour before you use the wrap.


Now, all that is left to do is preheat the oven and wait about an hour before you bake.

I hope this post has illuminated the purpose behind a small but important step.  If you have any other questions, please let me know in the comments.

Thursday, December 10, 2015

The Science Behind... the risen loaf


Hello everyone,

Today we'll be discussing the most misunderstood part of breadbaking ... the rise!

In this post, I'll be addressing:

1. What do you mean, "rise?"
2. Why does bread need to rise?
3. What causes bread to rise?
4. what causes bread not to rise?
5. How can I make it rise faster/slower?
6. Differences between baking powder/baking soda/ commercial yeast / sourdough starter


Ready?  Let's go!

1. What do we mean when we talk about bread rising?  Think about the last time you ate a piece of bread.  It probably had either big or small holes inside the soft part of the bread.  Those holes were made during the rising stage. A successful rise is crucial for good bread.


2. Why does bread need to rise?  Bread that doesn't go through a rise is very dense.

Think about it: if you are familiar with the story of Passover, you know that the Hebrews didn't have time to let their dough rise in their escape from Egypt and slavery so they baked it unleavened.  Eating matzo, which looks like a large crispy cracker, is the way modern Jews observe the prohibition on leavened bread during Passover.  Crackers are a type of unleavened bread.

Side note: one time in Sunday School, we were doing a lesson on the Passover and I brought two loaves of bread that were made with exactly the same ingredients and baked the same, but one was allowed to rise and the other wasn't.  The taste difference was pretty amazing!

Some breads only rise in the oven, such as quick breads like banana bread.  However, yeast breads require a separate leavening step because the gluten net needs to form to trap the carbon dioxide bubbles that eventually create the holes you were admiring in question #1.  The period of time when a bread dough rises is also referred to as its fermentation, proofing, or leavening period.  I'll explain more about this in a second.


3. What causes bread to rise?  Let's back up for a second and talk once again about the science of bread.  If you've been following this series of posts, you know that yeast bread relies on the relationship of three ingredients: flour, water, and yeast.  More specifically, 1) the relationship between the gluten net created by the flour and the water, and 2) the production of carbon dioxide as the yeast eats the sugars in the flour.  A successful bread is one in which the gluten net successfully traps the carbon dioxide.  These two processes must work in tandem.

So why all the fancy words for the rising step?  They describe different chemical changes that occur.  The proofing or leavening, is what you call the physical rising process that you can see.  Fermentation, however, is how flavor develops during the rise.  You see, not only carbon dioxide is released when yeast eat up all the sugars created by the flour and water.  Other gases are released as well, and these develop the flavor of the bread.  That's why, if you try to rush the process by adding a ton of commercial yeast, your bread won't taste as good as if you let it rise slowly, trapping in all those yummy gases.


4. What causes bread not to rise?  Sadly, lots of things can cause your bread not to rise properly.
don't let this happen to you!
  • First, the environment.  If you set your dough to rise in a cold room, the yeast will eat very slowly and the dough will take a very long time to rise.
  • Second, if your liquid ingredients are too hot, that can kill the yeast.  A good way to tell if your liquid is too hot is to stick a finger in it.  If you can keep it in there comfortably, then it's the right temperature.
  • Next, insufficient gluten formation could be a culprit.  You want the dough to trap the carbon dioxide.  If you have a very wet dough, do a few stretch and folds to strengthen the gluten.  Some flours, such as bread flour or all-purpose flour, have higher amounts of protein and form stronger gluten strands.  Whole wheat and rye flours do not form gluten easily.
  • Finally, if the yeast is old it won't activate properly.  Before adding it to the dough, it's always a good idea to add the yeast to a small amount of warm water or milk to make sure it's activating before adding it to your dough.  You will know it's working when small bubbles form and it smells yeasty.
  • I guess one more culprit for your unrisen dough is if you are using sourdough starter that is not sufficiently activated, or you didn't use enough for the size dough you are looking to make.
5. How can I make my bread rise faster? There are a few different ways to make your bread rise faster, although I would definitely proceed with caution here.  The best flavor comes from giving yeast a long time to rise and release tasty gases during fermentation.
  • Make sure to put the dough in a warm environment.  If someone has recently taken a shower and your bathroom is warm, put the dough in there.  Or the warmest room in the house.  Don't go too hot though - you don't want to accidentally cook your dough! 
  • Use warm water instead of cold.  Again, give it the finger test to make sure it's not too hot!
  • Knead your dough or give it periodic stretch and folds to strengthen the gluten.  
  • Use more yeast.  This is the tip that comes with the biggest caution.  Remember, yeast works in tandem with your gluten net.  If you have too much yeast and not enough of a gluten net formed, the yeast will produce tons of carbon dioxide, the dough will rise too quickly, and the carbon dioxide will escape, causing your dough to fall.  Too much yeast can be too much of a bad thing.  When I say too much, I mean anything more than 2 1/4 teaspoons of yeast per loaf.
 What if I want to make it rise more slowly?  Pretty much just do the opposite of what I advocated above. 
  • Put your dough into the refrigerator.  I usually mix my dough, cover it with plastic wrap, and put it in the refrigerator overnight.  Then I take it out the next morning and let it rise over the course of the day and bake it the next evening.
  • Use cold water instead of warm.
  • Use less yeast - 1/2 to 1 teaspoon should do it.
  • leave your dough alone - once you have mixed it up, don't mess with it.  Messing with your dough = more gluten formation = faster rise.
bread fail
6. Differences between baking powder/baking soda/ commercial yeast / sourdough starter.  Most of this post has been about using commercial yeast for leavening your bread. 

  • Baking powder and soda:  Anyone familiar with quick breads like banana or zucchini bread knows that baking powder and baking soda can also be used to leaven bread and give it a light, fluffy texture.  How it does that, however, is very different.  Because baking powder and baking soda are activated upon contact with water, milk or an acidic liquid, they need to be baked right away - no separate leavening step.  Breads that use baking powder and baking soda have very little gluten formation and the taste and texture are more like crumpets or biscuits.  In order to make sure your baking powder and baking soda dough will be successful, always use fresh powder and soda.
  •  Sourdough starter:  There is another way to get maximum flavor out of your dough - using a sourdough starter.  In order to use sourdough starter, you need to feed it daily to keep it active.  The amount of starter you add to a recipe should be about 1/5 or 1/6 of the total weight of the dough.  Dough that uses starter exclusively for its leavening purposes takes a longer time than one that uses commercial starter, so plan accordingly.

Update on the sourdough starter - I borrowed a sample from my MIL and it's now going gangbusters!  I'll hopefully have a post about it soon. 

I hope this post was helpful.  If you have other questions about yeast or the fermentation process, please let me know in the comments.