Monday, November 28, 2011

Finger paint


Maybe I should post a disclaimer right here: this is not a post about bread. Those who are looking for a bread recipe should just wait a few more days.  Bread Maiden has a post about biscuits that just needs a few more pictures before it can be published.  Sit tight.

For now, I want to talk finger paint.

When Little Bread Baby gets bored at mealtime, he loves smearing his food around his tray. 


So I was inspired to let him release his creative impulses in a constructive way, and maybe get some art for papa's office.

There was just one little problem.

How can I keep finger paint out of LBB's mouth?

I can't.  And many (most?) homemade finger paint recipes I found online included some sort of detergent or dish soap to give it the right texture and shine.  Even though dish soap is non-toxic, I didn't really know how much LBB would be eating, rubbing in his eyes, etc.

I ended up finding one edible finger paint recipe.

It was here.


The recipe only requires flour, water, and salt.  And food coloring.

I found some all-natural food coloring at MOM's.


Here's what you do.

As you can see above, you need:
  • 1 cup all-purpose flour
  • 2 tablespoons salt
  • Saucepan
  • 1 1/2 cups cold water
  • Wire whisk
  • 1 1/4 cups hot water
  • Food coloring

  1. Put flour and salt in the saucepan.
  2. Add cold water and beat with whisk until you get out all the lumps.
  3. Add hot water, turn the burner to low, and stir until it comes to a boil and the mixture is thick. 

4. Let the mixture cool.
5. At this point, you can either leave the mixture uncolored until you want to use it, or color as desired with food coloring.
6. Store covered in refrigerator.

 Here is my chilled finger paint.  After resting for 24 hours, it was pretty thick.  I spooned out about a tablespoon of goo into each bowl, then added about a tablespoon of water and mixed it up until it was the right consistency.


Then I added the food coloring.


The green was a little odd, but fine.  Next time I will probably add more food coloring so the paint is more vibrant.


Here is the work station before picture.


More interested in the newspaper than painting.


Ah well.

I mentioned adding more food coloring to the paint next time, because the colors were very muted.  Still, a good first effort. Once he decided he was interested in the painting, it held his attention for a good five minutes.  I consider that a success!


This recipe also makes a TON of paint, so we will have enough paint for many more art projects!

Sunday, November 27, 2011

Biscuits

Today we are celebrating a belated Thanksgiving with Mr. Bread Maiden's family.  We spent last Thursday in Hong Kong eating Thanksgiving dinner at a barbecue restaurant with my family, so it was only fair to celebrate once more a holiday that is all about excess.

When I asked what I could bring, Slow Learner (can we please retire this nickname? When your breads are equal and superior to mine, you need a more suitable nickname befitting your status as a co-Bread Maiden!) suggested biscuits.

This is my favorite biscuit recipe.

Not surprisingly, it is from Peter Reinhart's Artisan Breads Every Day book.


I've made it so many times, it's shocking it hasn't appeared in this blog sooner.  I use this dough not only for biscuits, but also for pot pie topping.


 Low-calorie these biscuits are not.


But heavens are they tasty, to quote a well-known radio host whose name rhymes with Karrison Geillor.

There are several reasons I like Peter Reinhart's recipe for biscuits.

For one, it uses cream laced with vinegar instead of buttermilk, to preserve the high fat content of the cream.

Second, this: he has you freeze the butter, then grate it to cut down on the time spent cutting the butter into the dough.


Ok, so now that I have you convinced this is the holy grail of biscuits, let us proceed with the recipe.

Ok, just a quick note.  There are some of you who like a more crumbly biscuit, one that falls apart in your hands and barely comes together for baking.  This recipe makes a slightly firmer, though still quite tender and very flaky, biscuit.

Moving on.

You will need:

2 tablespoons (you can eyeball this) white vinegar
1 cup cold heavy cream (we used half and half this time, and have used cream-top whole milk in the past)
113g cold unsalted butter
128g AP flour
99g pastry flour
1 tablespoon sugar
2 1/4 teaspoons baking powder
1/4 teaspoon baking soda
3/4 teaspoon kosher or sea salt (mmm sea salt)

1. Add the vinegar to the cream and put in the refrigerator to chill for 30 minutes or so.


2. Put the butter in the freezer (if you haven't done so already) to get nice and cold.


3. While the butter and cream are chilling, mix up the flours, sugar, salt, baking soda and baking powder in a medium-sized mixing bowl.


4. Once the butter is cold, take a grater and grate the butter into the flour.  Or into a small dish to then add to the flour once grating is done.

5. Stir the butter and flour until the flour coats the butter.  If you have big pieces of butter just break them up a little.


6. Now add the cream until the dough just forms a ball.  I did not do this and thus had to add a lot of flour during the kneading phase.


8.  Place the dough on a well-floured surface and cover with more flour.  Take a rolling pin and roll the dough out to about 1/2 inch height.

9. Fold into thirds like a brochure.  Turn dough 90 degrees.  Roll out again and fold again.  Repeat two more times.

10.  Now wrap the dough in plastic and let it rest in the fridge for 30 minutes while you preheat the oven to 500 degrees.


11.  Take the dough out of the fridge, roll it out to 1/2 inch thickness, then cut using a biscuit cutter or a pizza roller.  Your choice.

12. Move the biscuits to a baking sheet covered in parchment paper.

13.  Pop those bad boys in the oven, then turn it down to 450 degrees.  Rotate the sheets after 8 minutes, then bake another 6-10 minutes until golden brown.

14.  Let rest on a cooling rack, then serve!  These biscuits are so delicious and buttery, and the dough works for so many applications.

I wish I took pictures of these when they came out of the oven.  But since I didn't, here is another project where I used this dough.


Here it serves as the crust of two delectable chicken pot pies. Really, anywhere you can use short crust, you can use this recipe.  

Sunday, November 13, 2011

Graham Crackers


I have been meaning to write this entry for a while.  Finding the time to sit down and write is difficult when you have to wait for naptime.

This entry actually has to do with Little Bread Baby (LBB).  Also Little Bread Niece (LBN).  Here is a story about Little Bread Niece.

This is a picture of Little Bread Niece about a year ago.  She has a soy sensitivity which means her mother needs to be extra vigilant about ingredients in her food.  This usually means most of what she eats is homemade.  Not that that's a bad thing, of course.

LBB so far does not have any food allergies or sensitivities, but I think it's safe to say our family is more aware than most people about what goes into our food.  I decided to make graham crackers for Little Bread Baby after reading the labels of so-called natural and organic baby snacks.

These graham crackers are incredibly easy, and have no weird preservatives in  them.  I keep them in a plastic bag that I can throw in my purse or the diaper bag before heading out to the park.

Another bonus is that the recipe comes from Alton Brown, one of our favorite celebrity chefs (the only one we can really tolerate) on Food Network.

It has been slightly modified, but the original recipe is here.


The recipe is basically like a pie dough.

For those of you who think "pie dough is so hard to make," fear not.

The food processor is your friend.

You will need:

The tools
A kitchen scale
Baking sheets
Parchment paper
Wax paper
Rolling pin
Food processor

The butter

3 ounces unsalted butter, cut into 1/4-inch cubes and chilled

The dry ingredients

8 3/8 ounces graham flour.  You can find graham flour at Whole Foods or other specialty store.
1 7/8 ounces all-purpose flour
3 ounces dark brown sugar
3/4 teaspoon aluminum-free baking powder
1/2 teaspoon baking soda
1/2 teaspoon kosher salt
1/8 teaspoon ground cinnamon

The wet ingredients
1 1/8 ounces molasses
1 1/8 ounces honey
1 1/2 ounces whole milk
1/2 teaspoon vanilla extract


1.  Put the dry ingredients into the bowl of a food processor and pulse several times to combine. 
 
Before I go on, I would just like to point out that for the first time, I MADE MY OWN brown sugar.  Crazy, I know. 
Ok, moving on.

2. Add the butter and pulse until the mixture resembles cornmeal.


3. Add the molasses, honey, milk and vanilla extract.


4. Process until the dough forms a ball, approximately 1 minute.

At first, the dough looks like this:


Then this:


Then this.


5. Press the ball into a 1/2-inch thick disk, wrap in plastic wrap, and refrigerate for 30 minutes.

6. Preheat the oven to 350 degrees F.  Unwrap the chilled dough and place it onto a large piece of wax paper and top with a second sheet of wax paper.


7. Roll the dough out until it is 1/8-inch thick.


8. Remove the top sheet of wax paper and either cut the dough into squares using a rolling pizza cutter or do what I did, making little circles with a small biscuit cutter.  Your choice.  Put the cookies onto a baking sheet lined with parchment paper. Do NOT use wax paper for baking or your cookies will turn out all waxy and gross.


This is what you get when you ask your husband to take an action shot of you cutting out the cookies.


8.  Bake on the middle rack of the oven.  Depending on how thin your cookies are, bake for about 10-15 minutes or until the edges just start to darken. Remove from the oven, set the sheet pan with the crackers on a cooling rack and allow to cool completely. Once completely cool, break into individual crackers and store in an airtight container for up to 2 weeks.


 Aren't those lovely?  And LBB loves them.  We can take them anywhere for an easy snack that everyone likes.  And even though it does take some time to roll out and bake, the food processor makes quick work of the dough.


Wednesday, November 9, 2011

Torta di Riso Salata


 It's been said that necessity is the mother of invention.  I think it's true.  Although many of our inventions make me wonder if I really *NEEDED* them in my life.

For example, we went through a period cooking-wise when the finishing touch to a dish always involved wrapping it somehow in bacon.  Delicious, but we certainly did not NEED the extra bacon-y goodness.

However, this is a different story.

I need to find a way to get Little Bread Baby (soon to be Little Bread Toddler) to eat a whole ton of rice.  Mr. Bread Maiden decided that LBB was not getting enough carbs in his diet, so he made a big vat of brown rice and then left town for four days.

 LBB was not impressed with the rice.  What to do?

Go to the internets.

I had a shady recollection of having once in my life eaten something like a "rice pie." 

With Mr. Bread Maiden out of town, I didn't have a ton of ingredients or motivation to acquire ingredients.  I had a bunch of eggs and a bunch of rice.


Ok, that's getting there.  I don't have the bread crumbs or ricotta though.  But now I have a name for what I'm looking for.  Torta di Riso.

Unfortunately, using Torta di Riso as my search term means everything comes up looking like this:


 I guess that's ok.  My knowledge of other romance languages can help me figure out most of it.

However, now I've come to another problem.  All of these Tortas di riso are sweet.

 This is a perfectly lovely torta di riso with raisins, but not really what I'm looking for.

Not to worry.  Since I want something savory, I added "salata" at the end and tried again.

Boom.  Here we go.


This is easy enough to figure out.  Formaggio looks like "fromage," I know the word "latte," and "uova" sounds just like "huevo." 

The recipe itself is where things get tricky. My Italian is simply not good enough to parse this one out.

So I employed the help of Google Translate.


"The cake should not be too colorful."  Ha.
Using this translation as a guide, here is the final recipe I used.  This recipe calls for a pie crust but I didn't use one.

7 eggs
500 gr. cooked rice
200 gr. Grated cheese (I used mild cheddar)
100 gr. Melted butter
500 ml. milk (I messed up and added 500 grams of milk, but it turned out fine)
pepper
Salt

11. Preheat oven to 475 degrees F.
P2. Put rice in a mixing bowl.
33. Beat the whole eggs, then add them along with the grated cheese, melted butter, pepper and salt to the rice.
44. Add the cold milk to the rice mixture, then pour into a greased pie pan.  

At this point I was a little nervous that it was going to be too runny and not set properly.

5.5. Place the pan in the oven, then turn the temperature down to 375 after 15 minutes.  Continue baking for another 45 minutes or until brown and crunchy on top.  Serve warm.


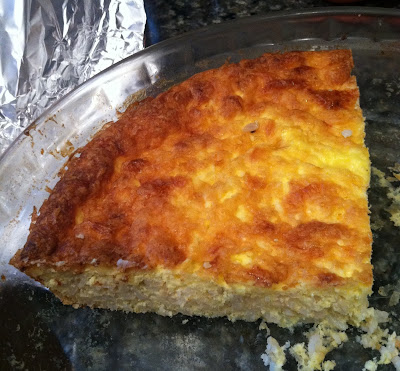
I didn't have anything to worry about.  The rice pie ended up delicious.


Once it cooled, it became very easy to slice.


Most importantly, LBB LOVED it.


Look at all that rice I used.  The recipe called for ALL of the rice (I'm guessing I had about 4-5 cups of cooked rice) to make two pies.

I think next time, if I want to make the recipe for grown-ups, I will add more seasoning or vegetables.  It's a little bland.

So, in conclusion, creative use of the internets can result in a nutritious meal with a few staple ingredients.  I don't think I would make this if I didn't already have a TON of cooked rice lying around, but since I did, it was easy to whip up.

Before I go, I've been asked to provide links to screenshots I publish here.

Mario Batali's recipe for torta di riso is here: http://www.foodnetwork.com/recipes/mario-batali/rice-pie-torta-di-riso-recipe/index.html

Here is the recipe for torta di riso with raisins: http://ricette.giallozafferano.it/Torta-di-riso.html

And here is the recipe I ended up using (minus the crust): http://www.ricettepercucinare.com/ricetta_toscana-torta_di_riso_salata.htm